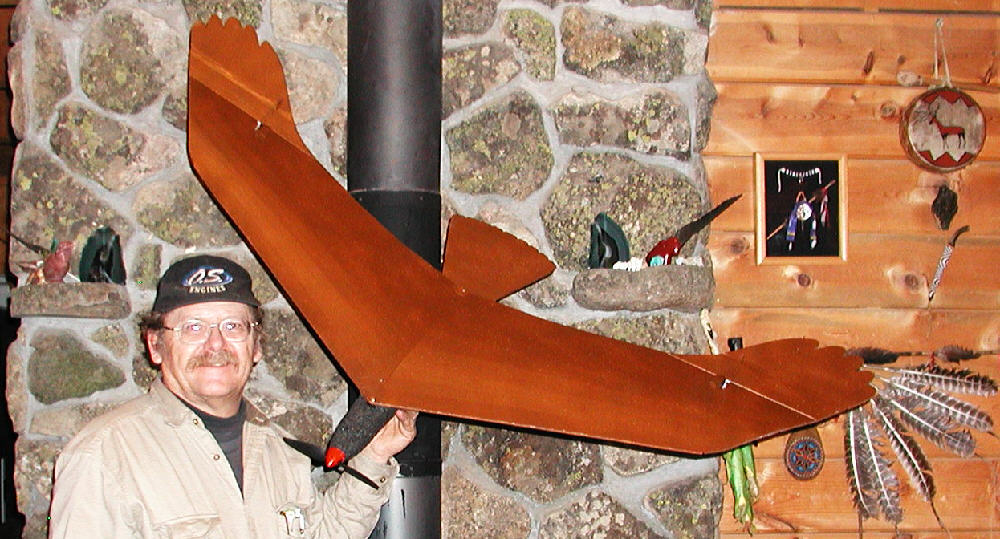
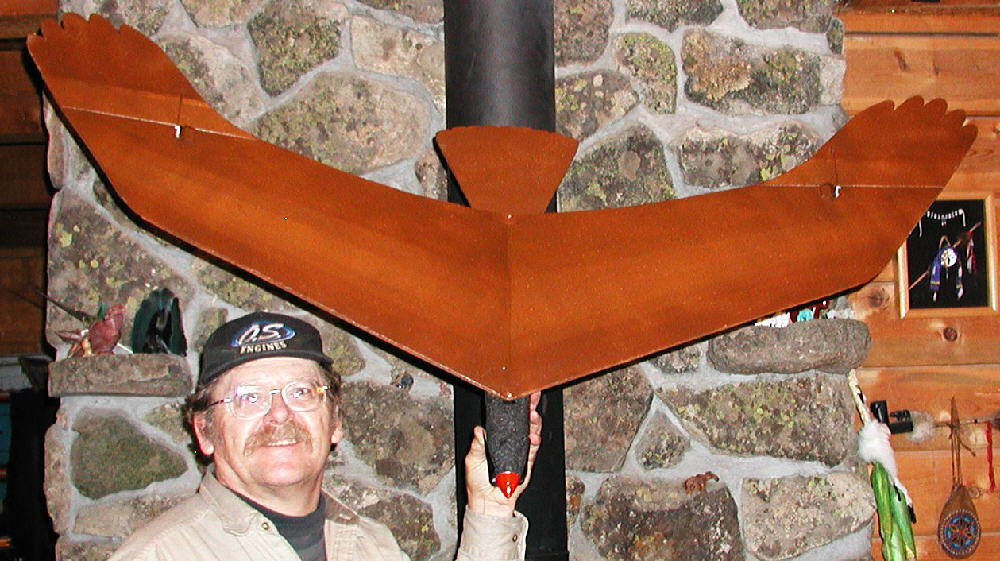
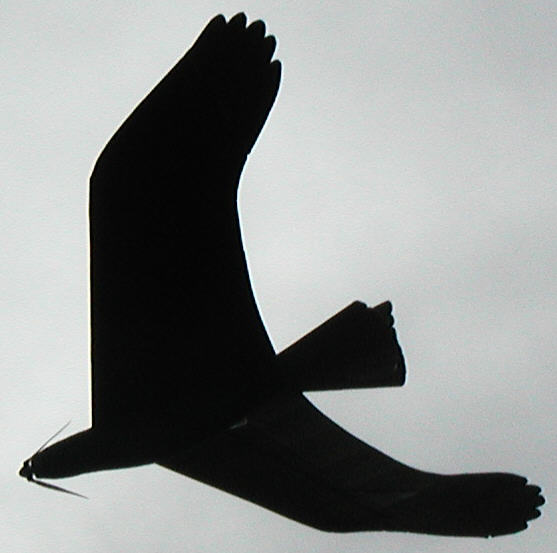
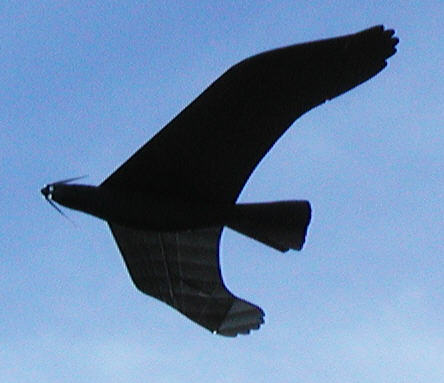
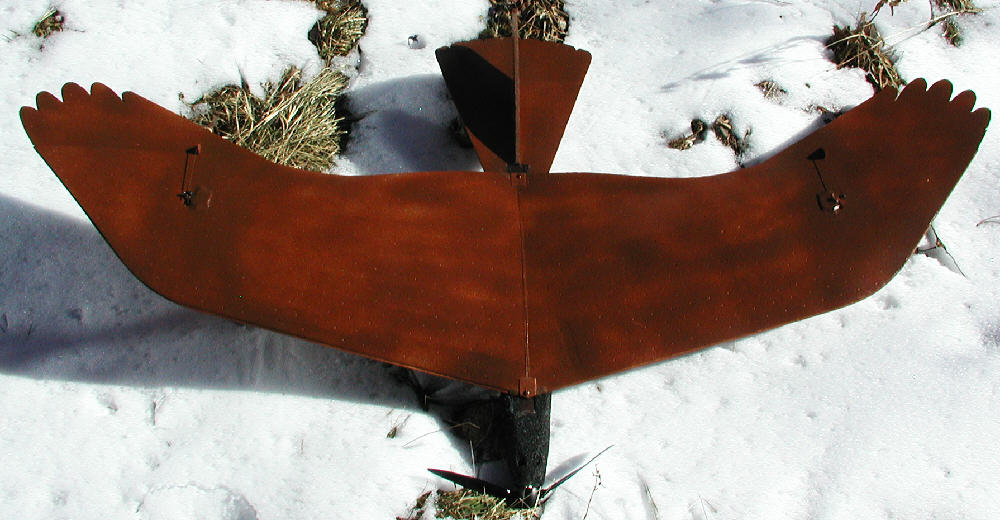
SOARBIRD is a 61" wingspan slowflyer / thermal cruiser built in a stylized soaring hawk shape. It should look a lot like a hawk or eagle from below when it's riding thermals above. (I've wanted to do one something like this for a long time!) There are already a few other bird-like designs of varying complexity; what I wanted to do was to come up with a design that would be relatively easy to build, without complex airfoil shaping or any hot-wire cutting.
SOARBIRD borrows it's basic wing geometry from the 'air surfer' design. It uses elevon controls, and due to the wing geometry / dynamics, it should not need any rudder / vertical stabilizer, so the silhouette should look quite hawk-like. Functionally, you could think of it as a dressed up flying wing in most ways. The horizontal stabilizer (tail) will not be servo driven, but could be able to be adjusted for trim if & as appropriate; it's primarily there for the bird silhouette, as viewed from below.
This one is light weight, with a light wing loading; it's being designed for slow flying & thermaling on light wind days (since I do not have access to an indoor flying facility)... so it will be out soaring with the local eagles & hawks.
It will use a CD-ROM motor and a folding prop on the nose. (This design is intended as a mellow cruiser, not a speed ship.)
It builds out from one sheet of BlueCor, one block of black EPP foam 2-3/8"x4"x20" for the body, 1 tubular 1/8" x 48" C.F. spar, and a few pieces of 3/32" diameter bamboo (from a matchstick window blind) as the main structural members ... K.I.S.S. is the design principle. The wing is a Bluecor single surface undercambered style- quick to build.
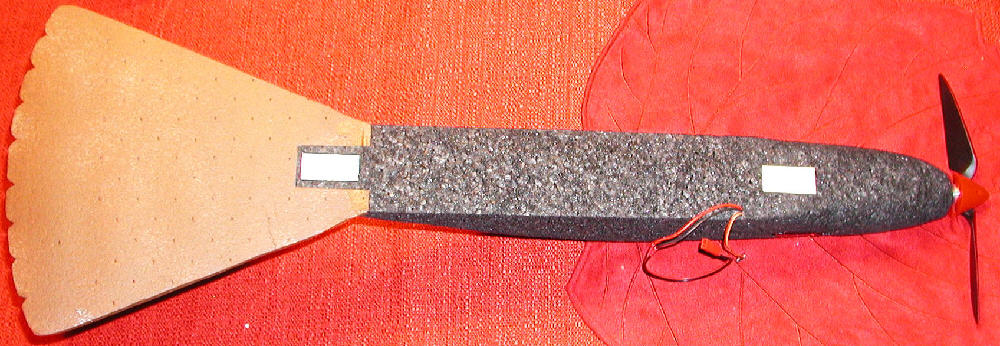
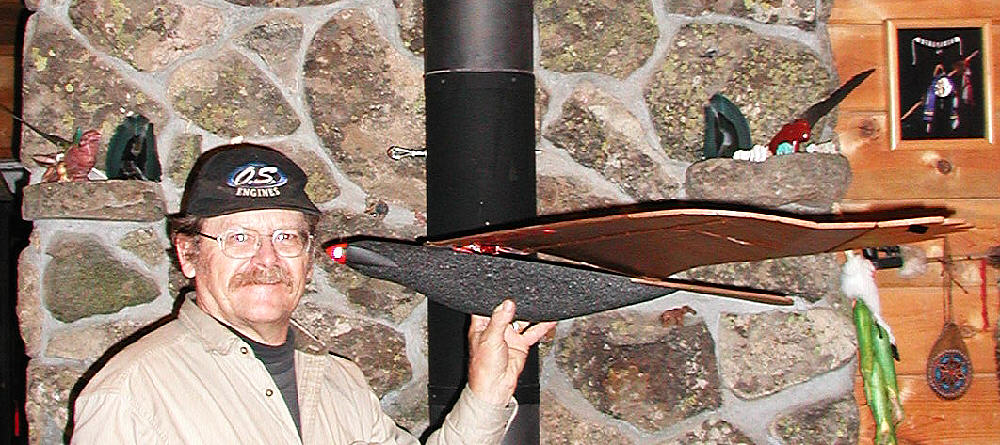
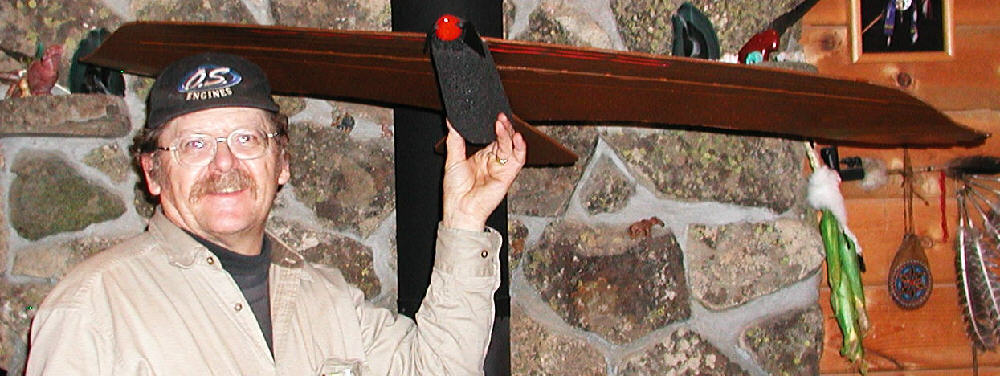
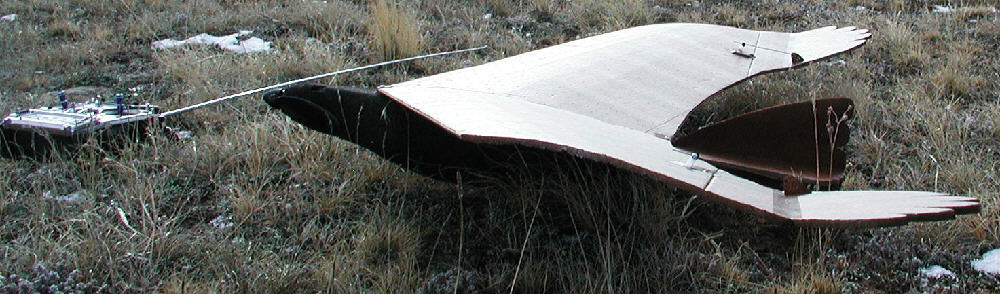
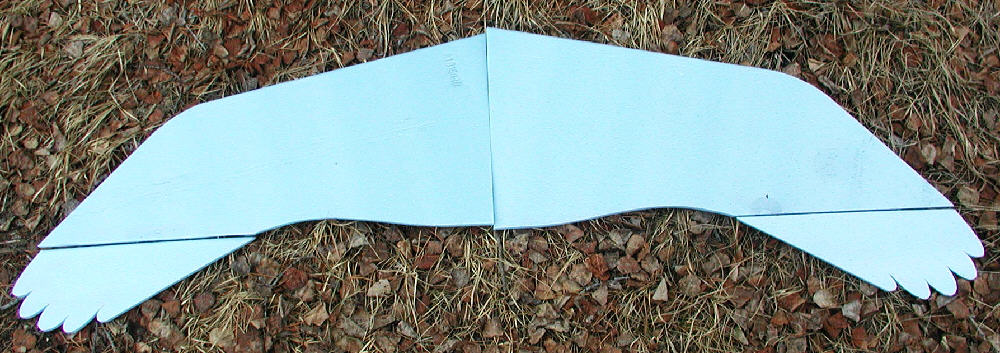
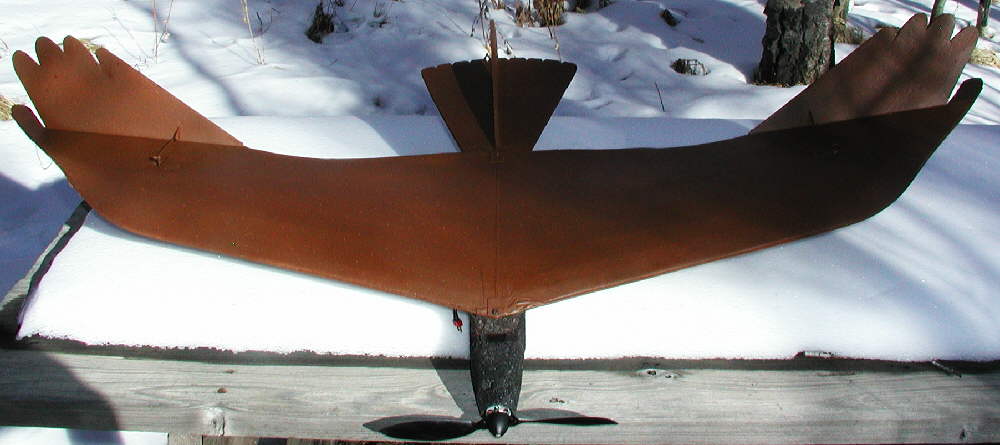
Attached are a couple of photos of the airframe, ready for painting & close to ready for gear installation; there are some details of wing mounting and motor mounting that are illustrated in later photos.
Dr. Tyler MacCready's influences on WindRider & AirSurfer
Friends,
This wing layout is loosly based on Dr. Tyler MacCready's work and his 'Walk Along Glider', as inplemented in the Air Surfer and Wind Rider glider designs. There's another RC Groups thread started back in October of 2002 on the "Air Surfer's Big Brother" that further demonstrates the viability of a wing of this planform; it was started by SPFD-E-FLYER.
http://www.rcgroups.com/forums/showthread.php?t=65870
You can buy a three-pack of the WindRider 'Walk-Along Gliders" from this web site, play with them, and go from there in scaling them to any desired size, and implementing your own adaptation if you are inclined:
http://www.windrider.com.hk/products/product.cfm?id=8
(WindRider also produces the BEE, one of the top competitive 48" slope combat flying wings being flown by the Colorado slope combat flyers these days; it's not listed on the site above, however, which only features the "toys".)
The deep sweep in the wings, placing the wing tips well behind, along with the substantial reflex of those wing tips MAY allow this design to fly without adding any vertical stabizers.
[Added note: this might be the case in no-wind & indoor flying environments; however, I'll add that for flying outdoors in windy conditions, I found later that adding vertical stabilizers both above and below the horizontal tail improves flight stability .... ]
That's one of my initial concepts that I'm investigating in building this prototype. (Reshaping the bird tail from a flat surface to some form of a Vee could also add a bit of stability without loosing the look, if needed.... lots of unexplored options at this point.)
If you were designing for a different performance envelope, - say, for a fully aerobatic flying wing, or a faster flying wing- then you'd likely do a lot of things quite differently. I'm working on a rather large lightweight slowflyer / thermal glider that looks sorta like a soaring hawk when in the air.... and trying to keep the construction fairly simple & inexpensive in the process.
GPW commented, " On all our "pure" flying wings the secret is sweepback , washout , and dihedral ... all three seem to be necessary for Finless stability ..."
GPW, thanks again for the input; you've brought up the very important aspect that adding dihedral will add greater stability... I'd first been inclined to try the flat-built wing because it would be simpler to add the one-piece spar to give the wing the needed strength... but I'm now inclined to build in some dihedral and deal with the spar joiners at the center joint as necessary. The added stability gained will be a "good trade", and having some hands-off cruise capability is well worth building into a light thermal soaring bird.
Flying back down out of those "BOOMER THERMALS" that we often encounter up here in the mountains will require more structural strength in the spar system than might be needed for a light indoor flyer; I'll be working on implementing that, too. On the 61" span, I'm already inclined to go to building in a tubular C.F. spar with a solid center joiner to gain the added strength as well as warp resistance there. The 3/32" bamboo alone just will not give that at this scale. (On this large of a Bluecor wing, setting and *keeping* the alignment will likely be an ongoing issue...)
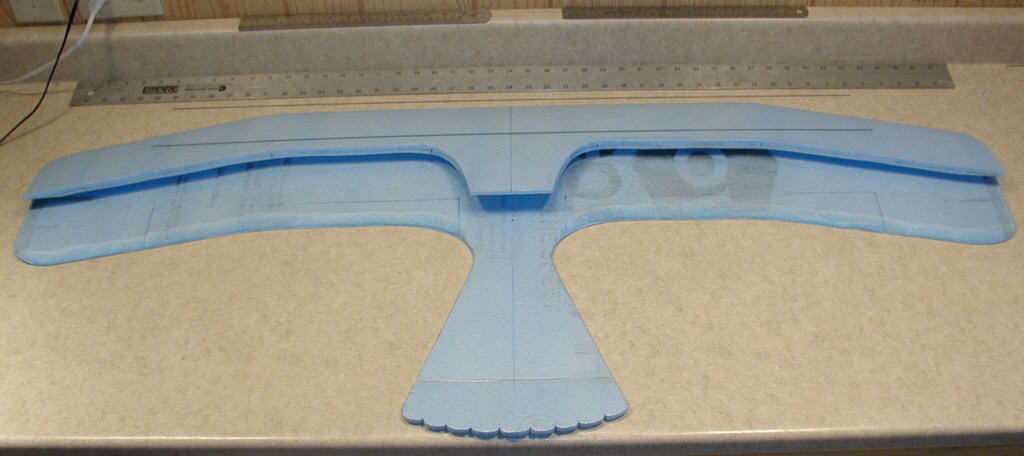
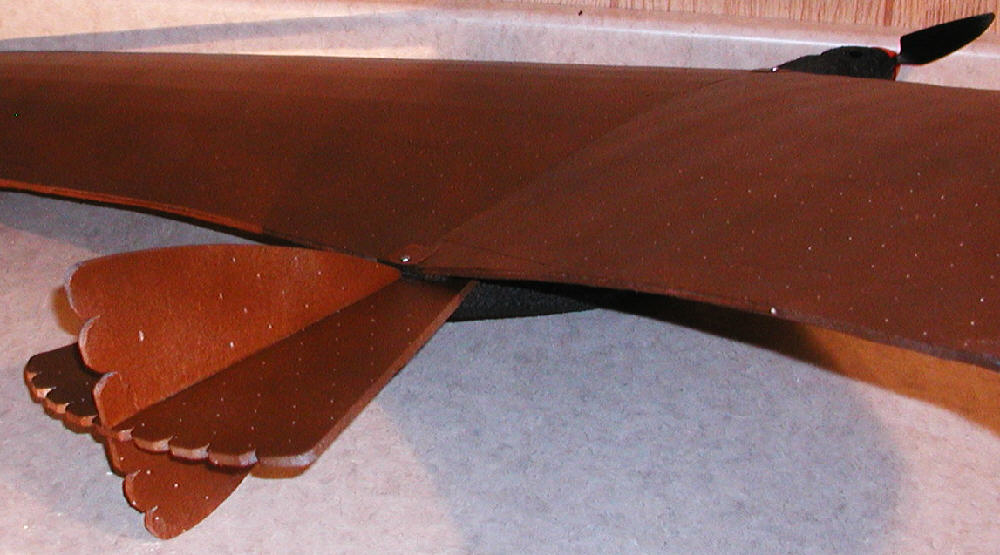
Here's a look at how the high dihedral wing is going together. Since flight without any added vertical stabilizer is desired, I've built in quite a bit of dihedral into this wing prototype.
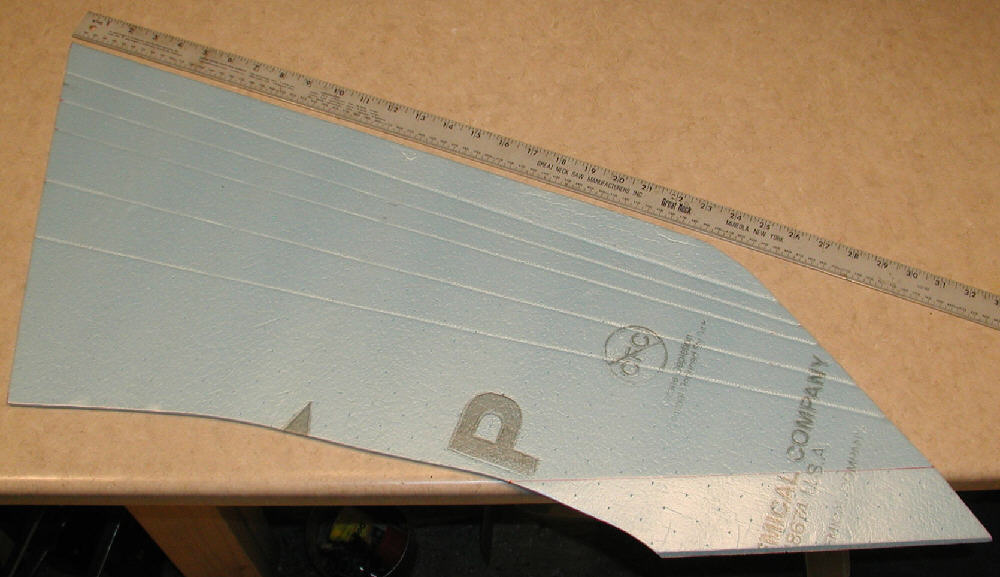
[Above] Underside of wing; reflex / washout is set in the trailing edge first
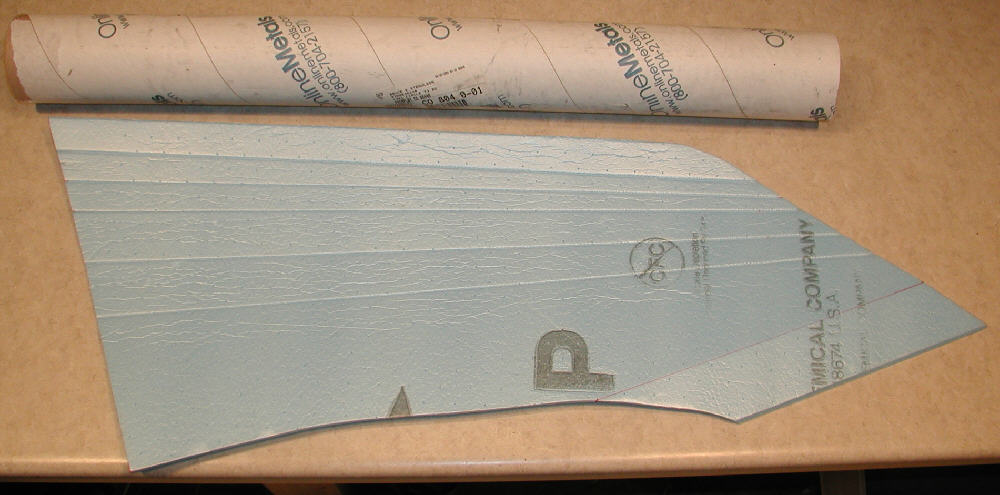
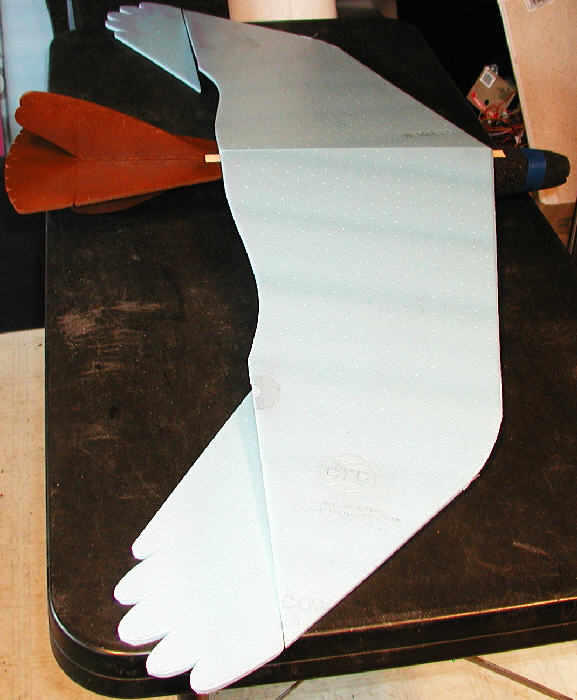
[Above] The undercamber is done next; (I decided to use the creasing method on this wing.) The 4" tube and rolled counter top edge were used to do the shaping; GPW's "Bendfoam Jig" coulds be used if it will handle this long a wing panel
73.7 KB - Views: 61
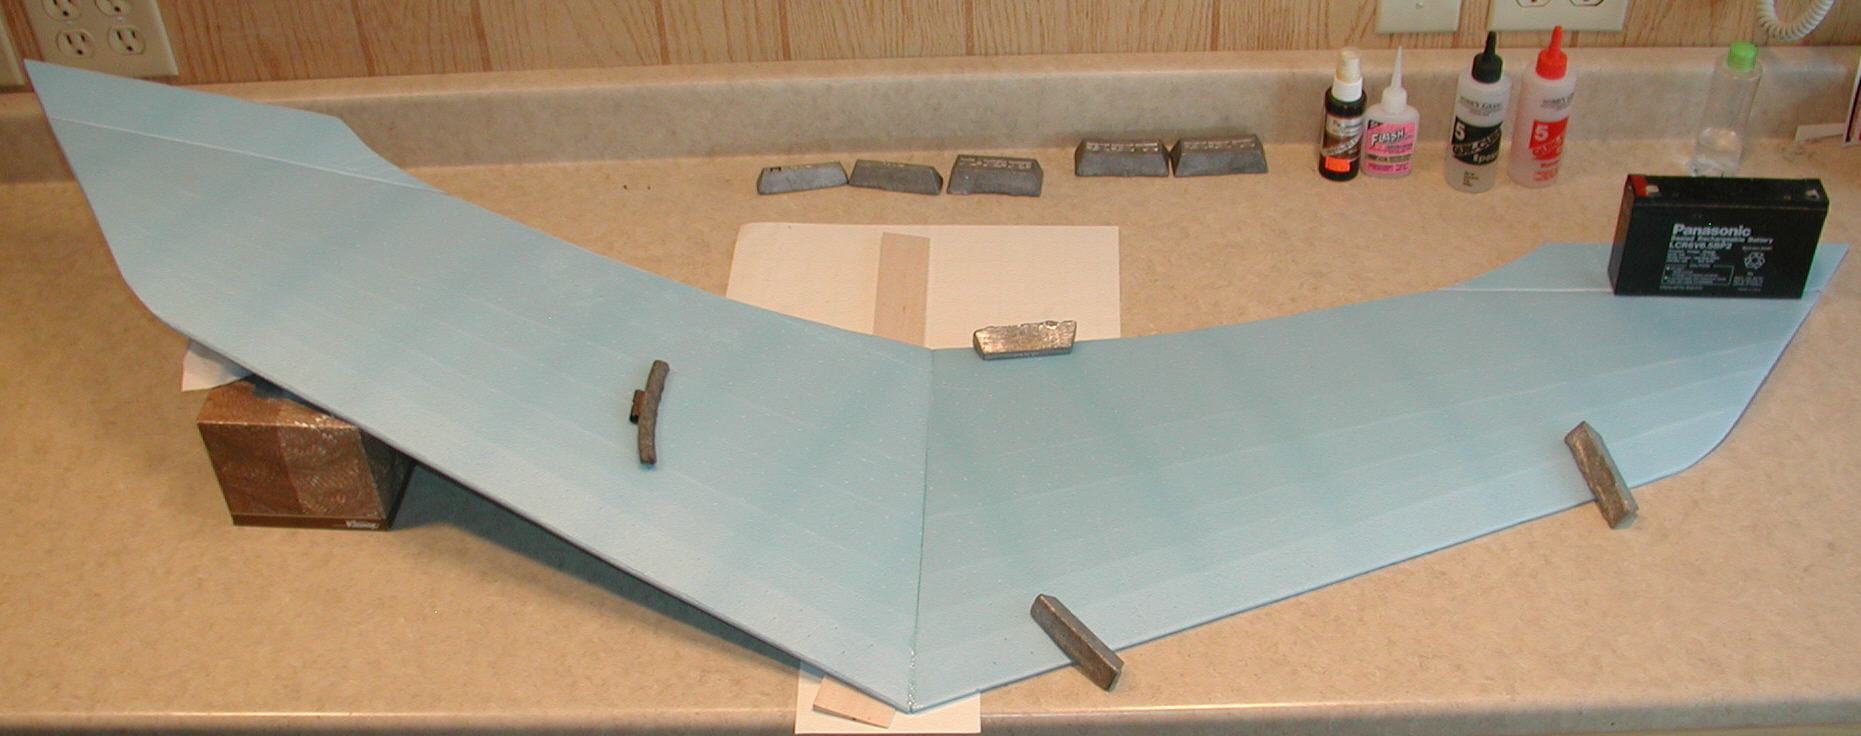
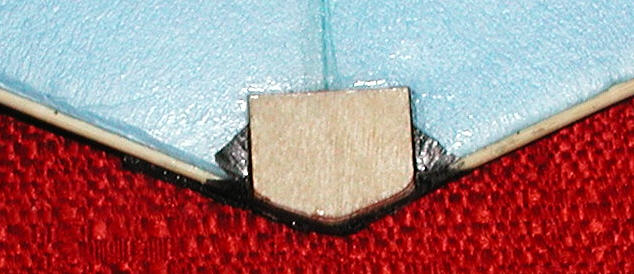
[Above] Center was sanded for dihedral joint, 'woodpeckered' so 5 minute epoxy would penetrate deeper, then glued. Lead weights& a handy block were used to hold everything in position while the epoxy set.
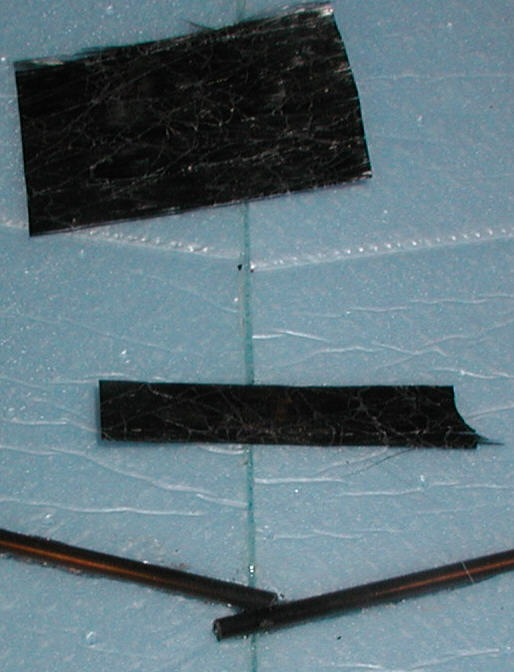
Power option and folding props
Here's a couple of photos of the CD-ROM motor and Folding prop I'm presently planning to use. The motor is a GoBrushless GBv1.0 kit motor, wound with 21 wraps of 26 gauge wire; WYE termination will be used. I'll fly it on a 2S LiPoly.
The folding prop with the red spinner was bought from BPHobbies; it's set up with 8x6 blades. (The hitch in using this inexpensive folding prop set is that the motor shaft adaptors available are either 2.3mm or 3.2mm, while the shafts for GBv motors are 3.0mm.... I'll have a friend with a mini lathe drill out the collet to 3mm for me... I've butchered too many of them trying to do it without a lathe! The good news is the reasonable price- under $10.00
The Multiplex Easy Glider prop can optionally be modified, and blade lengths trimmed from the stock (9.5"x6.5"?) for use. (I did this for my Wild Wing.) (Sold for $8.50 to $10)
DYMOND Modelsports sells fancy aluminum spinners with 3mm collets for use with the Freudenthaller blades, too, so about any set of blades could be used on a kit brushless motor. (About $15.00 for the spinner set)
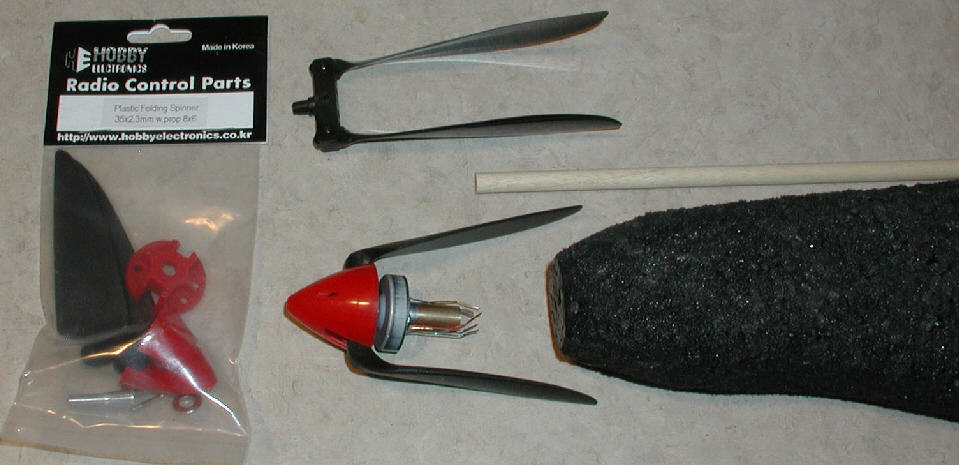
[Above] Upper folding prop is one for the Multiplex Easy Glider, etc.; it can be mounted on a E-Flite 3mm prop adaptor by cutting off excess plastic & then drilling it out. The lower folding prop is more ideal, but requires drilling out a collet from 2.3mm to 3.0 mm
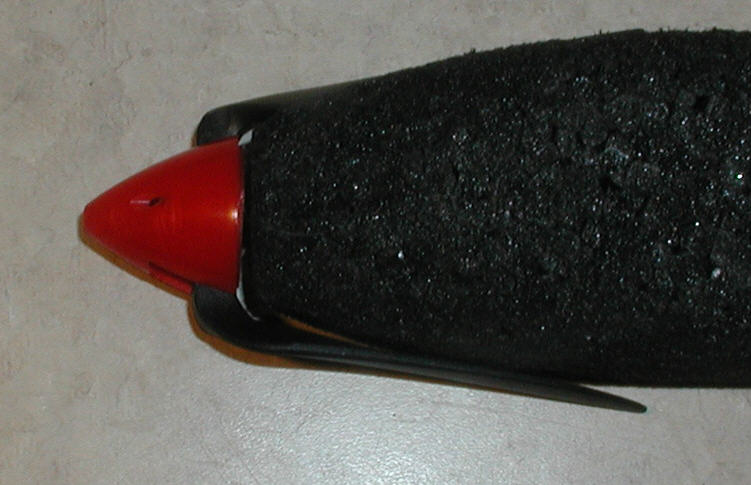
[Above] 8x6 Folding prop matches the EPP hawk body's head fairly closely; the Multiplex prop midpart is narrower, blades stay flared out wider (as they do on the Easy Glider too!)
CD-ROM Motor install in EPP Fuselage; Spar joining with C.F. Tow
I worked on the motor installation in the nose of the EPP body / fuselage this evening. Here are three photos of the process / approach I used, with captions.
I also installed the two piece tubular C.F. spar on the underside of the wing at aproximartely the center of lift of the airfoil, then added carbon fiber tow in multiple layers over the slight overlap at the center of that spar joint.
I installed 23" of 3/32" bamboo dowel (from matchstick windo blind) to either half of the leading edge, and 23" total across the trailing edge; C.F. tow was also CyA-ed in place to reinforce the center joints in both of these areas. The wing is now plenty strong for a under 11 ounce slow flyer / thermal riding bird!
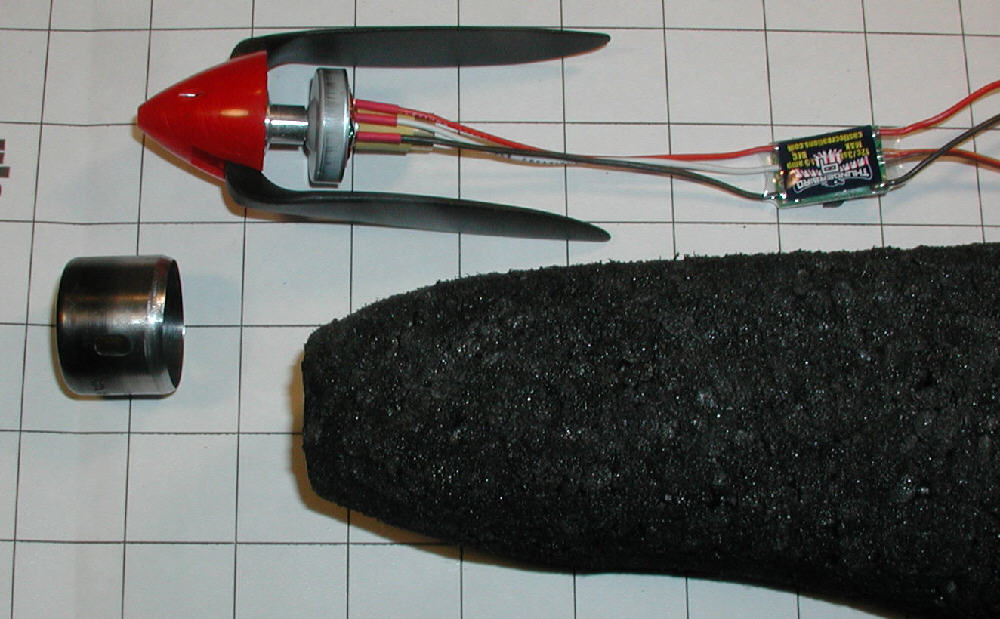
[Above] Cylindrical cutter used to cut recess inside EPP nose for the motor; (slightly different / shorter prop adaptor may be used for the folding prop.)
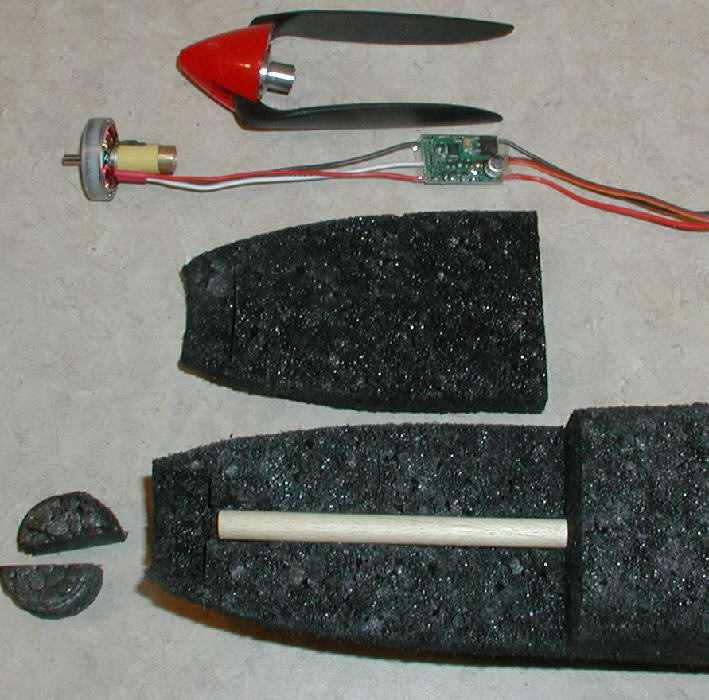
[Above] Upper half of nose, back 4-3/8", is cut away; 5/16" dowel for motor mount is epoxied in place
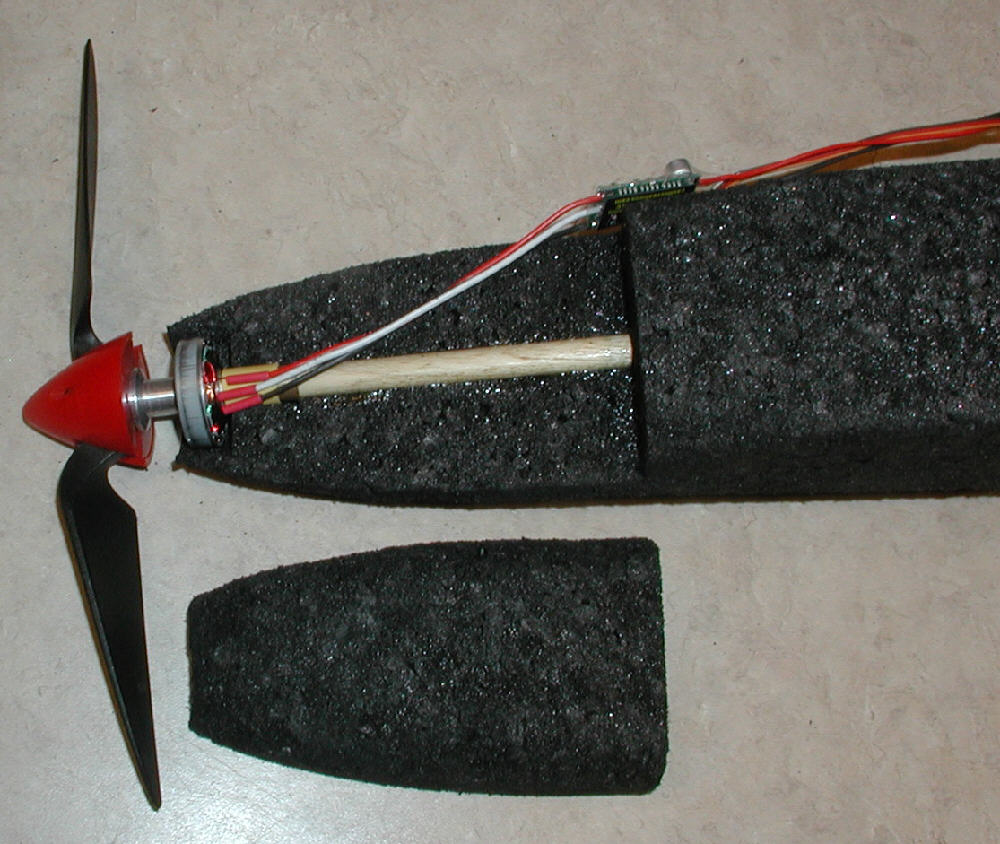
[Above] Motor temporarily in place; top hatch block of EPP will have motor cooling air exit vents, wire channels
[Above] 1/8" C.F. tube spars on underside of wing, ends slightly overlapped, ready for overlay of sevral layers of carbon fiber tow
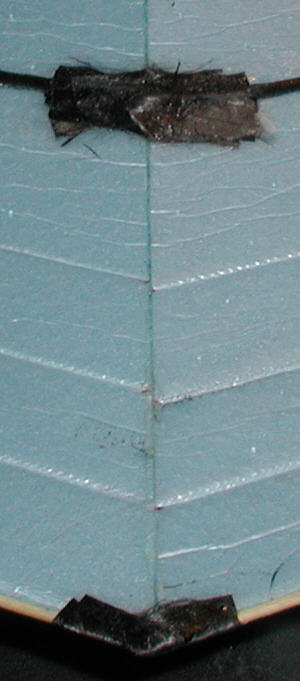
[Above] Finished result: Carbon fiber tow in place with foam-safe CyA on the center C.F. tubular spars, and on the bamboo leading edge spars' joint... plenty of strength for a <11 ounce bird!
Fuselage and wing mounting details, plus a new paint!
Soarbird is progressing nicely; I managed to find a good looking brown spray paint at a Lowes store; it is a new Rustoleum "Fabric Paint" in MOCHA BROWN. This spray paint is foam-safe, and results in a flat finish... nice for a bird! After doing a quick test on a scrap of foam, I painted the tail. It covers well & looks good as a base coat. The wing will also get a base coat of this same brown paint.
The wing will be removable from the body on this SOARBIRD; a couple of screws will be used to hold it in place. (This will allow me to later easily swap to the ducted fan powered body, flying the same wing.)
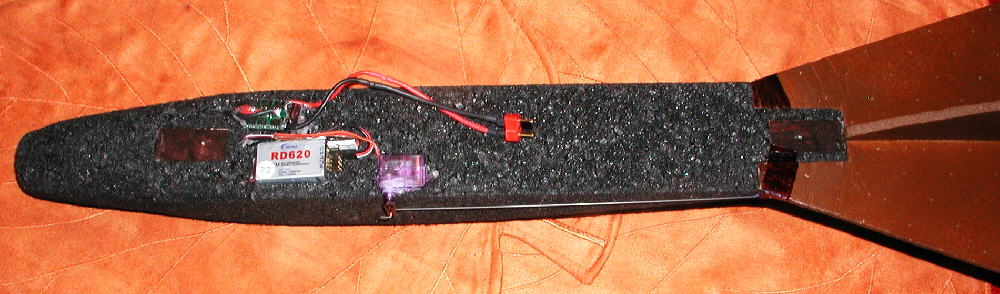
The ESC & wires are inset in the EPP foam for minimum drag.
Photos have captions to further clarify the build progress.
Wing servos are now installed in the wing tips; long extension wires are soldered in between the servo body & the wire's plug, so the leads reach the receiver mounting location up under the wing. The servo wires follow the back side of the C.F. main spar on the wing's underside. (The motor battery will also get mounted up over the body, under the wing.) I'll shoot more photos when the servo linkages & control horns are finished- this will happen soon.
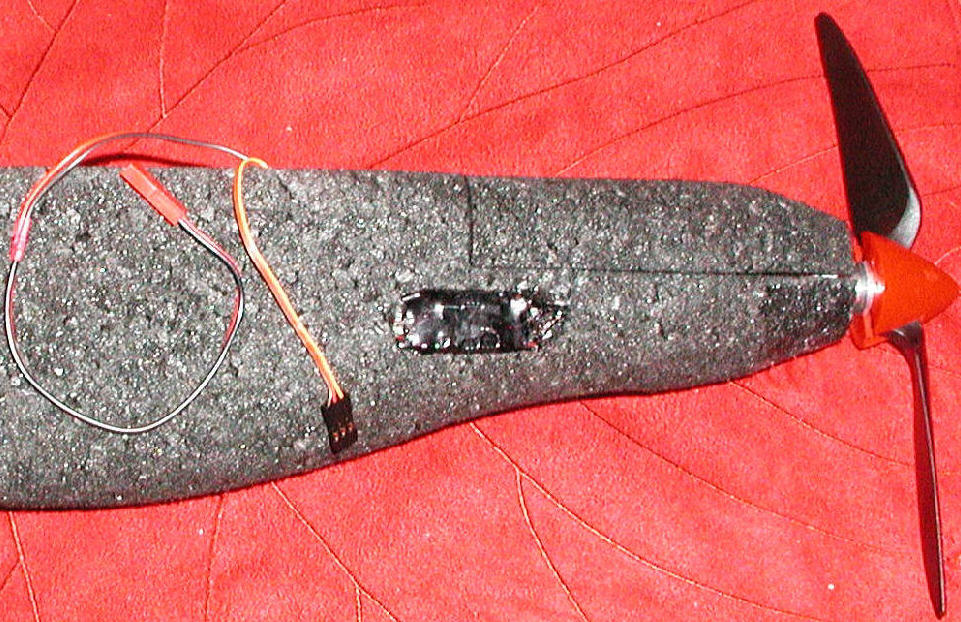
[Above] Side view if the bird body / fuaelage, with the CC Thunderbird 9 ESC set in flush with the surface of the EPP foam, leads buried within the foam. (ESC label removed, & heat shrink cover has been darkened to blend in when seen from a distance.
[Above] The tail is painted with Mocha Brown Rustoleum "Fabric Paint" (bought at Lowes); it's a new foam-safe, flat finish paint. Wing will also get a base coat of this paint.
[Above] Body top view shows two light colored wing mount ply plates, 1/6" " birch ply, inset flush with the foam's surface. The tail is also inset to be flush with the wing mounting surface. There are EPP fillers glued to the underside of the wing.
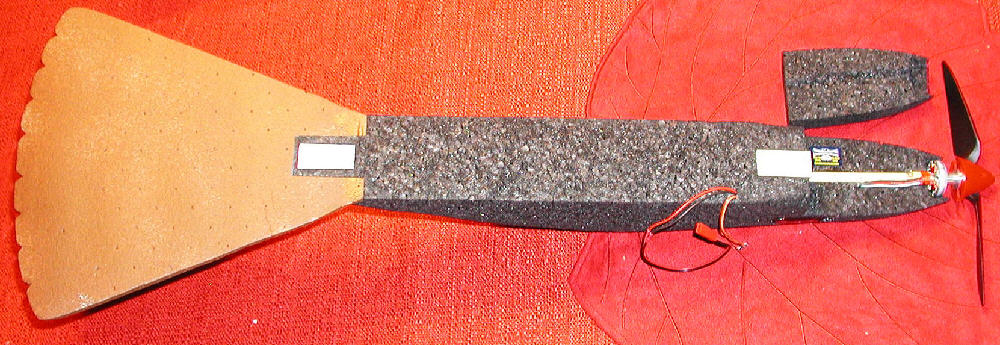
[Above] Upper forward block removed to show the motor mount, etc. It will soon have motor cooling air vent cut through to exit on the upper surface.
[Above] Wing mounting leading edge top plate of 1/32" thick birch ply glued in place; another is on top at the wing's trailing edge center.
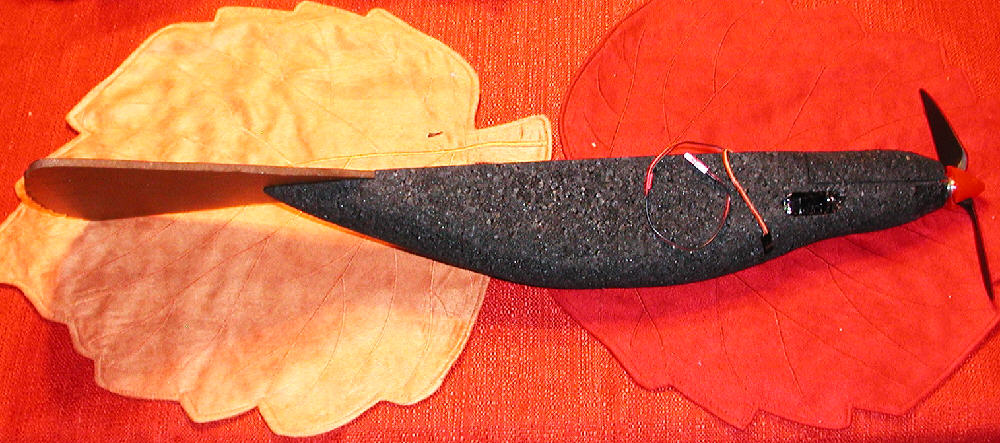
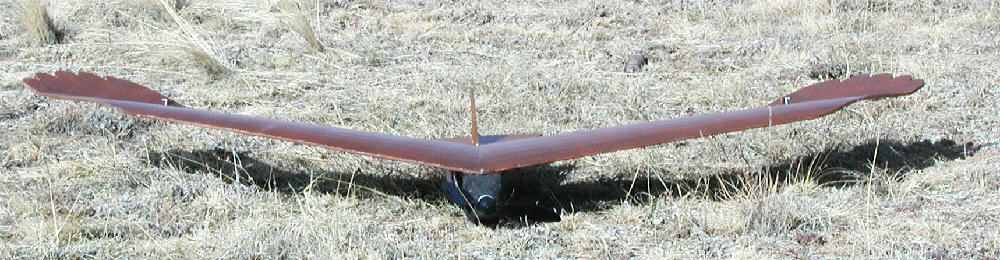
Ready for flight tests
Here are four photos of the flight-ready SOARBIRD; (the new Rustoleum "Fabric Paint" in 'Mocha Brown' worked well, and bonded well to the Bluecor wing. This paint coat added about 1 ounce to the completed aircraft, and will make a superb base coat for the added trim that will be applied later.
SOARBIRD has the final setup completed, ready for the flight tests. I used two Bluebird BM306 servos and a CORONA RS410 receiver. The final flying weight is at 10-3/4 ounces using the 2S 800mAH LiPoly packs. Wing area is in the 4 square foot range, so the wing loading is under 3 ounces per square foot; (I'll get more precise data and specifications later.)
The 8x6 folding prop is mounted with the short prop adaptor core, and the top forward motor access hatch is vented and mounted in place. The radio receiver is mounted to the under side of the wing; (the flight battery will also be mounted in the EPP body just under the wing.)
I'll do test flights when the high winds we are presently experiencing have let up! - I'll post more details and a flight report before long.
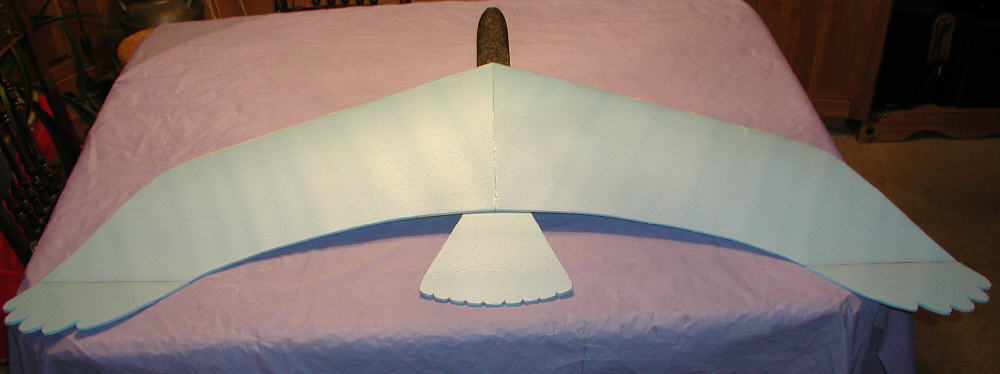
[Above] SOARBIRD with paint base coat complete & setup completed, ready for first flight tests.
[Nov. 7th, 2006] I just learned this morning that BPHobbies has just begun to stoick the 8x6 folding prop sets with a 3mm motor shaft collet adaptor; (these were not available yet last week when I had ordered other folding props...)
These are great for use on CD-ROM motors such as the GBv kit motors, etc... Yesterday afternoon I had reworked a 2.3mm collet out to 3mm for use on SOARBIRD- a very touchy job to do without a lathe.
http://www.bphobbies.com/view.asp?i...03&pid=A3558014
[NOV. 10th, 2006] Winds have been up quite strong since SOARBIRD was completed. What is evident at this time (after four rather brief flying sessions in windy conditions) is that
1 - This first wing, as built, is far more ideal for flying indoors, or in quiet or light wind conditions. It is NOT a wing design for windy conditions (which are far more prevalent in the South Park region of the Central Colorado Rockies where I live & fly. This area is more of a slope flyer's dream area...)
2 - the 8x6 folding propeller generated only very modest thrust on the 2S LiPoly battery pack; it's a characteristic of the prop blade design, as a GWS 8x6 slow flyer prop running on a similar motor, same wind, & same battery does generate a lot more thrust. When a 3S 640 mAH battery was used, the RPM went up from 7600 RPM to 10,600 RPM- a major increase in performance. The current draw was still at only 4.7 Amps.
3 - In windy conditions, the first prototype SOARBIRD was subject to the gusts, and lacked stability; let's face it- a big wing with less than 3 ounces per square foot wing loading is not going to perform in gusty windy conditions! It did want some added vertical stabilizer area. So I built a second tail, adding vertical stabilizer area both above and below the fixed horizontal stabilizer. This improved it's handling without disrupting the bird-like look too badly. I'm looking forward to a quiet air flying session now; it's made it through about 25 launches & landings so far in very challenging wind conditions, with no signs of the sheer fright I've likely put this poor light bird through in the process...
4 - The further thought I've come to, in evaluating this SOARBIRD prototype to this stage, is that BlueCor (especially in a single surface undercambered wing of this type) may be less than suitable for a wing this large for outdoor, windy weather flying conditions. There's a lot of wing-warping evident when this 61" span is rocked by wind gusts, and while the wing is generally strong enough for a 10-3/4 ounce airframe, it does lack a bit of the rigidity that I'd like to achieve. The scale of this wing is quite possibly a bit too large for execution in Bluecor, if outdoor flying is a primary task. I'm already working on the design concepts for a ~44' span wing that will handle more winds with far more ease.... and still look much like a stylized soaring hawk when seen from below!
The photo below shows the second tail; (it simply is swapped out with the first tail for the flight testing, and did offer more stability.)
[Above] Second tail with vertical stabilizer members was built to test fly in gusty wind conditions; it offers improved stability.
{NOV. 11th, 2006] SOARBIRD is flying very well!
I finally got a morning without gusty winds, so even though the thermometer was sitting on 11 degrees early, I headed out to work out SOARBIRD's setup / flying details.
The first two packs were flown with the BPHobbies 8x6 folding prop, but it was quite obvious by the end of those flights that, even on the 3S LiPoly packs, this prop was not generating enough thrust- SOARBIRD was climbing anemicly and stalling repeatedly.
The fix? I quickly ran back to the shop and installed the MULTIPLEX 9.5x6.5 folding prop. (By the time I was heading back down to the flying area, the thermometer had made it up to 25 degrees... balmy!)
What A DIFFERENCE a prop makes!!!
This prop REALLY generates a lot more thrust, and SOAREBIRD was off & climbing nicely!
I played with battery positioning / balance and elevon reflex, ending up with the amount of reflex shown in the last photo below.
Four ravens cruised by to check out the new bird in the neighborhood, and while I think they were trading derisive remarks among themselves about SOARBIRD's flying style, they did not crowd him too closely.
After running back to the shop once more to do a quick job on the elevon linkages & wing tip tempering, I decided to finish off my morning by flying some gusty crossing winds in the small bowl just across the road from my house. It handled the challenge well, but as the wind direction was continuing to shift even farther around to an unfavorable direction, I decided to call it enough for the morning... (it was time to recharge all of the batteries again, anyway...)
I did stiffen the elevon linkages before the last flight- (I added a section of carbon fiber rod, bound to the 1/32" music wire with kevlar thread & thin Cya glue), and it did help. At high speeds / full throttle with the Multiplex folding prop, there had been a tendancy to induce some oscilations / flutter into the wing tips. I also used the heat gun judiciously to 'temper' some of the BlueCor in the wing tip area before that last flight in the gusty crossing winds, and I'd say it did improve control response, as it resulted in a bit more rigidity in those areas.
By the way: I mounted the Multiplex folding prop on a prop saver, which works great! - K.I.S.S. RULES!!!
Final assessment after this morning's flying?
SOARBIRD really IS COOL!!!
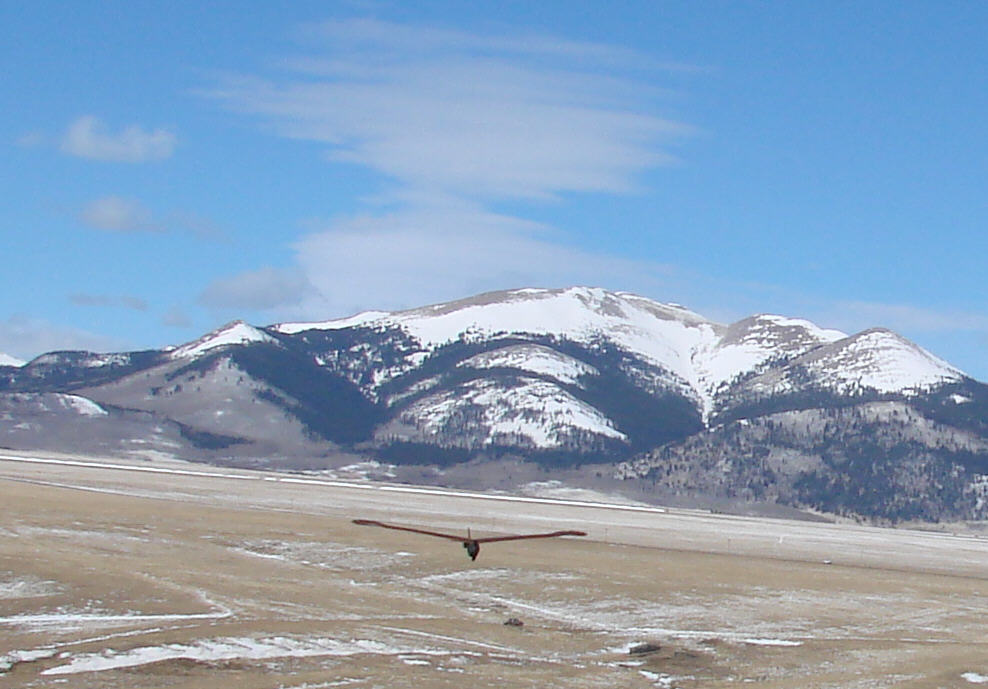
[Above] SOARBIRD gliding overhead; (Note: I set down the transmitter and took all of these photos myself as it was gliding over; that's a comment on the glide stability!) Multiplex folding prop has narrow mid-part, so blades do not fold in tight, but glide is very good!
[Above] SOARBIRD is riding very light lift well!
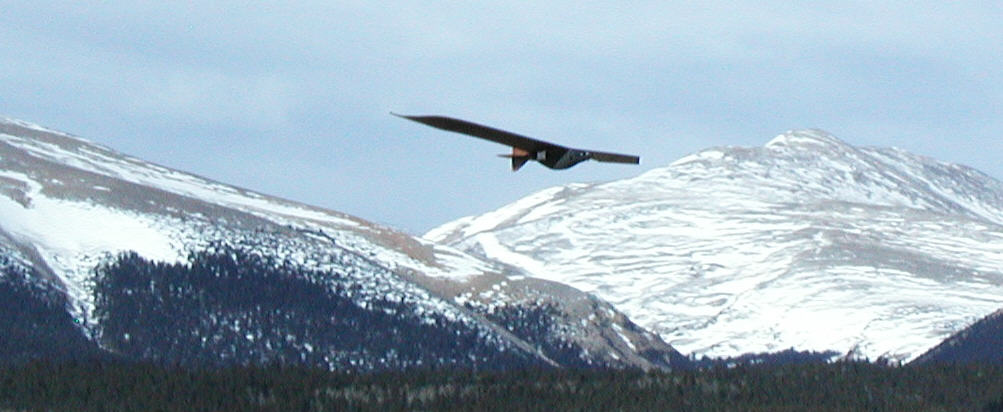
[Above] Long low approach to land; Mt. Sherman in the Background.
[Above] EPP body handles landings nicely, while protecting this bird.
[Above] A photo showing the elevon reflex as it is flying now; handling well!
I'm inclined to build out another different high speed / high wind wing version, and leave this wing very light; [the heat tempering of the BlueCor foam in the wing tip area, along with stiffening the elevon linkages, did add enough more rigidity to have it handling the gusty cross-winds in the tight tree-lined bowl just in front of my house quite well...]
Heavily undercambered airfoils are not really good above certain speeds, so Brad's sugestion of closing in the bottom of a Bluecor wing, or SPFD's comment on hot-wiring a wing would probably be more appropriate than just stiffening the Bluecor single layer wing. A BlueCor wing closed off on the bottom with DocuLam film might be a good next design step for SOARBIRD.
SOARBIRD is really quite flyable as it is, within it's own performance envelope limitations.
I've cut some EPP wings with hot wire, (*kitted a couple of designs on a limited basis) and am definitely thinking of going that way on a later generation; this build log thread is focused on a more simple undercambered Bluecor winged slow flyer / cruiser that most builders can knock out without going into hot-wire techniques & equipment.
[Nov. 12th, 2006] 53" Wingspan SOARBIRD now in the works
I ended up back in the shop instead of out flying on Sunday.
I'm already building another prototype: SOARBIRD II. This one is being built with a 53" span, and I'm also adding an elevator on the bird's tail, so I can test that variant for control response / stability in higher winds & gusty wind conditions, in comparison to the first SOARBIRD. Both will be in the air next weekend if all goes well.
I've built in about three to four degrees downthrust into the motor installation on this new body / fuselage.
[Nov. 13th, 2006]
Stylized Bird-Like Silhouette
Light Weight, Low Wing Loading
Stable Flying; Thermal & light wind slope soaring capability
Capable of Very Slow Flight & Landing Anywhere; Durability
Adequate power to climb quickly, loop, handle some winds
K.I.S.S. approach: Simple Build Techniques
With a BlueCor wing, the 61" SOARBIRD is flying at under 11 ounces, & the 53" prototype SOARBIRD II will include an elevator, & still be under 11 ounces. It's wing is relatively quick & easy to build. (Tail-less was never a design factor in achieving SOARBIRD's bird-like flying profile - it needed a tail to complete the look anyway.)
SOARBIRD II's wing has less leading edge sweep, the outer wing joints are moved inboard substantially, the wing tips / elevons are reshaped and stretched back inboard significantly, and the wing's inboard trailing edge has been reshaped into a more curvilinear profile (which should look good in the air.)
Span is at 53-1/2", chord is reduced at the root by about an inch.
The body / fuselage is just slightly shorter with a somewhat shortened head; the EPP foam head around the motor is somewhat slimmer so that the Multiplex folding prop should sit folded a bit closer in glide mode. The tail is actually stretched for now, with an elevator hinged in place.
[Nov. 15th, 2006] SOARBIR II dimensions
SOARBIRD II's wing is 52-1/8" span at the trailing edge. The wing root chord (center) is 12-7/8"; if the leading edge were extended out to a line parallel to the root, the tip chord would be 6-7/8". The elevon wing tips add on beyond this, for a bit more area than what is removed from the front outer corner of the wing; the total wing area comes out to close to 500 square inches, about 3.4 square feet. This amount of BlueCor weighs 2-5/8 ounces. The spars add another 5/8 ounces.
At a flying weight of about 10-3/4 ounces, this comes out to a wing loading of just over 3 ounces per square foot. That's a light bird!
The solid EPP foam body is made from a block of 1.3# density foam that is 2-3/8" wide, 2-3/4" high, and 18-5/8" long, shaped by band-sawing & then carving with a sharp fillet knife before sanding, to end up looking somewhat like a bird's body. After shaping, & with the motor mount shaft and wing mount plates epoxied in place, the body weight only 1.0 ounce. (The tail group, assembled, glued, & painted, weighs 1/2 ounce.)
[Nov. 17th, 2006] SOARBIRD II's fuselage
SOARBIRD II's fuselage is about ready for flight; (photo below.) The electronics all are mounted or embedded in the EPP foam where the wing will cover them. Final work on the new wing will be completed this evening, ready to fly tomorrow. I'll post more photos soon, & then the flight report.
[Nov. 18th, 2006] Soarbird II is now ready to fly! Flying weight is at 10-3/4 ounces after the wing was painted; that's a weight gain of 3/8 ounces over the unpainted wing. (The added elevator and it's servo and linkage are part of the weight tradeoff while shrinking & changing the shaping of the wing from the first prototype SOARBIRD.)
3 Blue Bird BMS308BB servos are used; therse have coreless motors, offer 17 ounce-inches of torque @ 4.8V, and weigh only 6.2 grams each. The Corona RD620 receiver allows use of two aileron / flaperon servos; flaperon setup allows for programmable & switchable aileron reflex trimming for cruising, slow floating, or landing modes.
Winds are, unfortunately, holding at about 20 MPH in South Park today, with higher gusts forecast... far less than ideal conditions for doing the trim flights on an aircraft with a undercambered airfoil and just a little over 3 ounces per square foot wing loading!
Below are a couple more photos of the SOARBIRDS. The first is of the original SOARBIRD gliding off a slope flying site recently. There was a distinct lack of thermal lift that afternoon, cold air, and what breezes wer moving were not oriented into the hill, so I'm looking forward to better light wind slope flying conditions another day. I'll comment that the heavily reflexed wing tips are not ideal for either high speed climbing, or for clean efficient gliding; my impression is that there's a lot of drag.
OH- one hawk & a couple more crows cruised by to check out the new bird in the neighborhood, but none of them crowded SOARBIRD too closely.
SOARBIRD II has radio range issues; I'd run the antenna in the EPP foam fuselage, but it's now being moved out & onto the underside of the wing. I'll replace the .032" music wire elevator control rod with a C.F. rod, too, to minimize the possibility that it is a specific sub-harmonic length of the 72 MHz carrier, and may therefore be masking the antenna's ability to pick up a good signal.
This newer wing design & setup is VERY promising! There's very little aileron reflex being used in the minimum flaperon setting, and it's definitely an improvement over the much higher aileron / elevon reflex initially set up on SOARBIRD I. I'll write more on this later once I've done more test flying & setup tweaking.
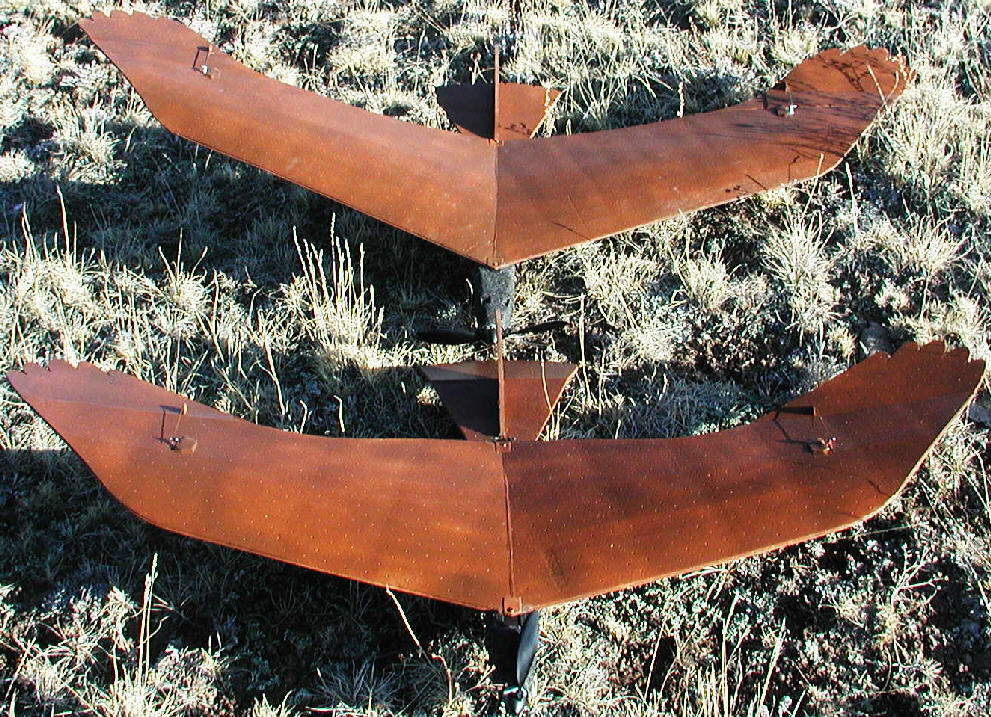
The second photo is of the two SOARBIRDS together. (The angle of the photo isn't the best to give a comparative perspective... )
[Nov. 19th, 2006] Today's flying indicates that SOARBIRD II's wing is performing well, and the ~4 degree downthrust on the motor mount installation is better than without; my impression is that this bird would still like to have more positive wing incidence relative to the tail. I'll have materials along & be prepared to do further testing to attempt to define the optimum incidence on my next test flying opportunity.
[Nov. 22nd, 2006] The undercambered Bluecor wing requires some positive wing incidence, relative to the tail / horizontal stabilizer, to fly with less aileron reflex (for a cleaner, more efficient glide.) I shimmed the wing's leading edge up about 9/16" ; than might come out to about 2 degrees of positive incidence, typical for Jedesky type airfoils. I still am flying with some up elevator trim... the ideal / most efficient setup would have SOARBIRD flying with zero up elevator trim....
The Motor was acting less than happy recently, & finally gave up; I'd built & flown it without a vented can... this I now realize was a mistake; 19 winds on 3S LiPoly, trying to run the LARGE 9.5x6.5 Multiplex folding prop, definitely generated an excess of heat, & I'm now rewinding the motor to 21 wraps of 26 gauge [Y termination.] I'll be using one of the http://www.StrongRCmotors.com/Cans.htm vented cans when SOARBIRD II goes back into the air, and using a CC Thunderbird 9 ESC. More flight / setup testing & optimization will be possible after that motor rewind is completed.
I'm considering slightly reflexing the entire trailing edge of SOARBIRD II's wing to equalize out the effects of the undercamber, & thereby increase the glide efficiency. I'll report on the results of this experiment when it's done.
I will report that SOARBIRD II is climbing well, looping tightly- (4 to 5 foot loops), & able to roll OK in it's present configuration; it was never meant to fly upside down, but it can easily do enough of the crazy maneuvers to possibly scare off agressive hawks. So far, the hawks that have cruised by have been only curious, and have shown no agressive tendancies... that should be expected to change in the spring, however, when flying near nesting areas. The ravens always come over to check out the new bird in the neighborhood, but while they talk the trash talk, they also have not been agressive- they do sometimes stay around SOARBIRD longer than the hawks.
[Nov. 26th, 2006]
SOARBIRD II, with the added elevator and the spoileron control of the aileron reflex, is definitely out-performing the first prototype. (I flew them both again today in gusty, variable wind conditions; without the elevator, SOARBIRD just is not happy in gusty winds- especially when compared with the quick responsiveness of SOARBIRD II.)
So before long, SOARBIRD I will get another updated tail and an elevator & servo. I'll upgrade it's receiver to a 6 channel receiver , so I can use the flap switch to change the aileron / wing tip reflex.
For flying SOARBIRTD II, I have the (spoileron control) flap switch in the minimum aileron reflex position for launch under power, & the elevator is trimmed for good climb without zoom; once I've climbed to altitude (or punched out in front of the slope a comfortable distance when flying slope winds with this lightly loaded bird) and I cut the throttle, I'll switch in the up reflex for more efficient gliding. [Reflex amount is programmable on the RD8000 radio I'm using.] It's working NICELY!!!
A 48" span might be large enough when working with BlueCor, etc. Both of my SOARBIRDS are larger & very light on the wing loading. I was flying a 3S 1500 LiPoly battery pack in the gusty wind conditions yesterday; my impression is that the slightly heavier wing loading will actually handle better in gusty wind conditions.
I'll build out a new tail structure for the 61" wing next... I may actually end up doing an entirely new body& tail while I'm at it, so the inverted V-tail may very well be tried in the process. Building in about 4 degrees down-thrust in the motor mount is desirable, and having roughly 2-1/2 degrees of positive wing incidence relative to the tail is also desirable. From there, having the spoileron reflex programmable & switchable in flight offers the rest of the setup / trim variability that allows for clean efficient glide.
[Originally Posted by gpw on NOv. 28th, 2006:]
"What about using a tail like on the real thing .... you could glue one servo arm to the side of another servo and attach the tail to that arm, and the tail would rotate sideways and Up and down..sorta' like the RC ornithopters do ... crumbs for thought ???"
[My Reply:] It's food for thought... Soarbird really does not need any 'rudder' control, only the vertical stabilization area, and the elevator for pitch control, independent of the wing tip reflexing in power-on versus power-off flight modes.
Having a full flying tail mounted directly to the servos would put all of the flight loads- & especially landing loads- directly on the servo's gear train... without using larger / heavier servos with full metal gears, Murphy says we would likely get to replace servo gears often while flying in the real world's sometimes less than 'groomed' landing zones...
If anyone else does build a variant on a tail for this wing style, let us know how it works!
[Decenber 4th, 2006] Wing tip Ailerons are very 'exposed' on the SOARBIRD prototypes; less than perfect landings- especially when flying slope winds with rocky landing areas- can put a LOT of stress loads on the gear trains of micro servos. I've now had to replace gears in three of the Bluebird BM308 micro servos over the last three weeks while flying SOARBIRD II at various flying sites... the itty bitty teeth on the smaller gears in these servos are possibly not robust enough for this job....
This brings me to consider building a more robust SOARBIRD III prototype, using larger aileron servos with more robust gears; I also may redesign the wing tips with a fixed tip section, to protect the movable portion & it's servo located just inboard of it.
SOARBIRD II did handle well in ~10 to 12 MPH winds on a small slope recently. The ability to control the wing tip reflex is reaklly showing it's value in slope flying conditions, as well as in thermal cruising efficiency. (I really haven't been out in decent thermal conditions lately, however, so that aspect will be tested when conditions allow.
[BELOW] : A photo from a wintry flying session at Teke's "Lost Creek RC Airpark" in the Central Colorado Rockies December 3rd, 2006.

New wing in the works
SOARBIRD has a new wing designed & cut out, ready for assembly. I've reduced the span to fit each half across the narrower dimension of a sheet of Fan Fold Foam, (I'm using double faced BlueCor), so two sets of wings can be cut from a single sheet of this material. In dodging the folds, the wingspan ends up at about 47".
One of the other key changes I'm also retro-fitting to my other wings: There is a single fixed 'feather' at the wing tip extending past the end of the aileron panel now, to protect the aileron servo from damage during landings in rough conditions. This should offer the possibility of long servo life using light inexpensive plastic geared servos.
(On the previously finished wing, I simply cut away the tip feather from the aileron, and am mounting it solidly in place to the main body of the wing.)
Carbon Fiber rods (or bamboo rods?) will be added to the edges of these wingtip fixed 'feather' extensions, to be sure they can hold up to the possible loads in rough-field landings. (A strip of the Scotch 'extreme' cross-filament tape may also overlay the outside edge for increased durability.)
The root chord of the new 47" wing matches SOARBIRD II's root chord dimensions right now; that will make it quick & easy to test fly this new wing on the SOARBIRD II body very soon.
After further test flying, I may be ready to finalize the SOARBIRD body template / plan for a third prototype version body design. SOARBIRD's third prototype body will totally enclose the flight battery, servos, and receiver. It's top surface will likely be contoured to closely match the undercambered wing's underside profile, to further minimize drag while supporting the shape of the wing.
This design is progressing nicely and is already flying very well, and the third generation will implement all of the details. (Photos will be posted soon.)
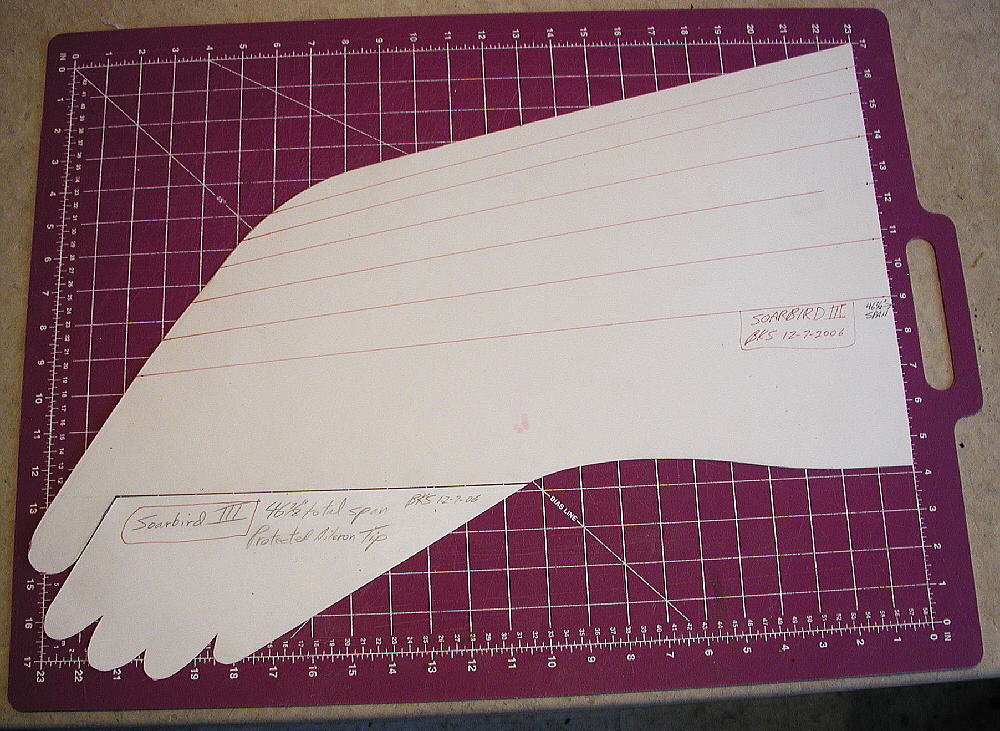
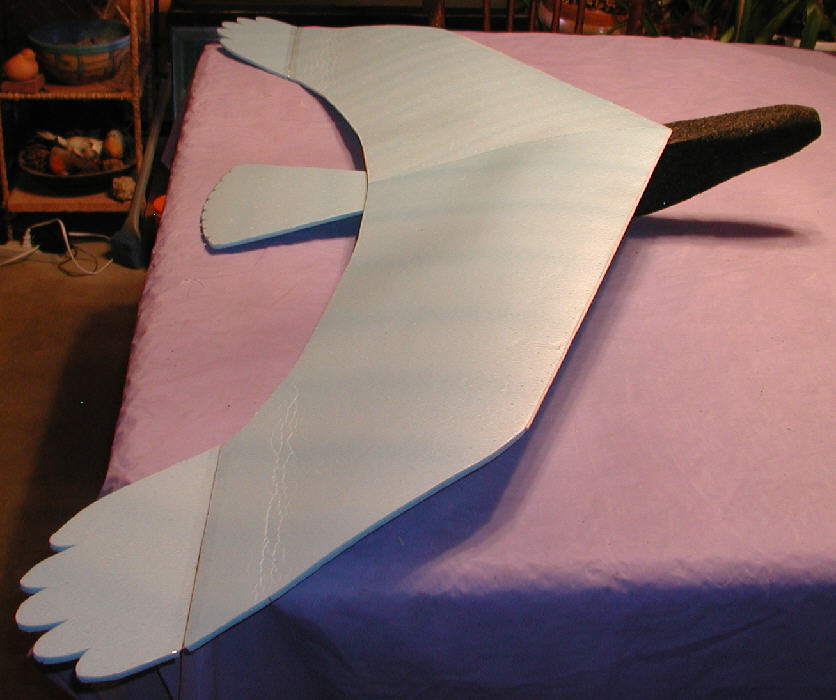
[ABOVE:] Wing tip modifications; 47" wing template / plan
Here's two new photos; the lower one is of the wing tip modification I did to the 53" span wing on SOARBIRD II. The cutting template for the new 47" wing is also shown (above) on a 1" grid cutting mat background for scale.
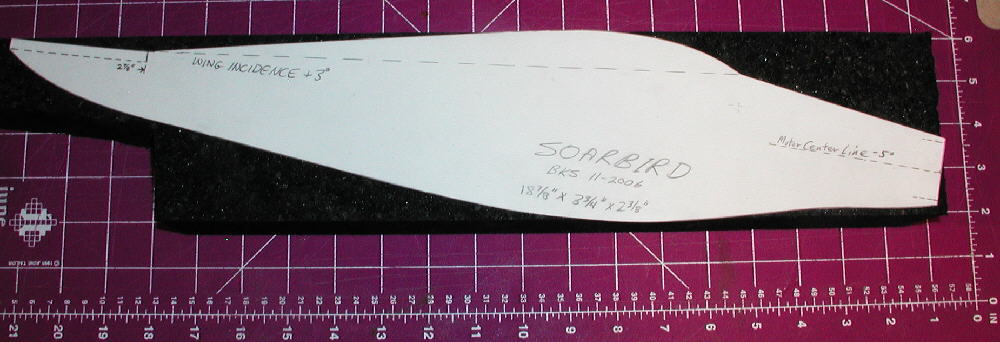
Below is a photo of the tailgroup and body / fuselage cutting templates. The Tail is the zero incidence reference; the wing is set at +3 degrees relative to the tail; the motor mount is set at minus 5 degrees relative to the tail.
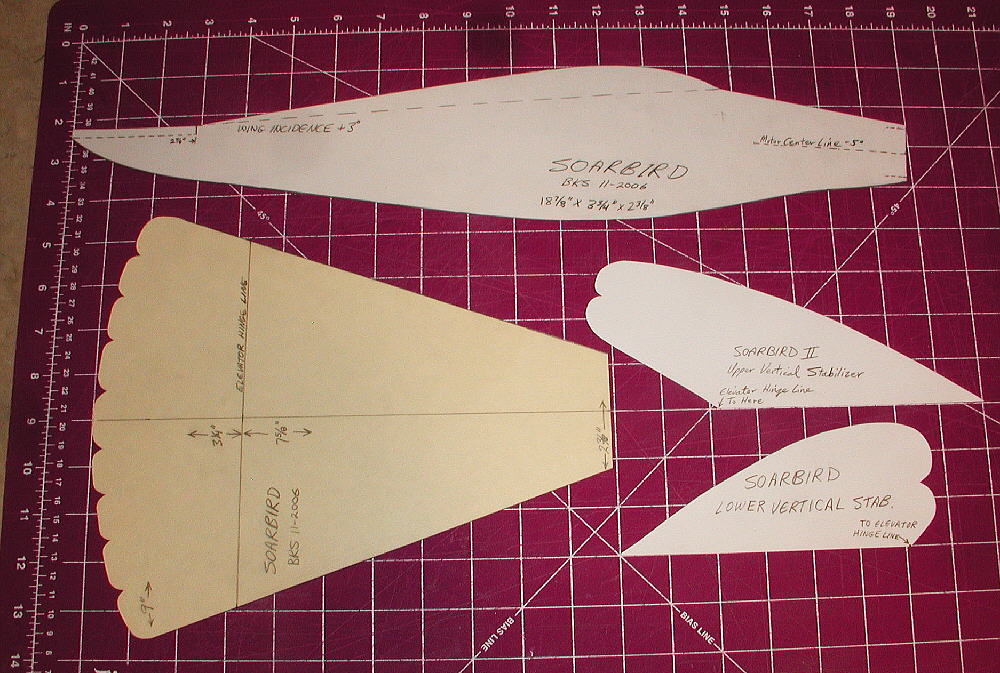
Below, the body / fuselage template is ready to be pinned to the block of 2-3/8" thick EPP foam; it will then be band sawed to shape. A sharp knife and sanding block will be used for the final shaping.